
FREE Doesn't always = EASY !!!
Last weekend ..while out galevanting around ..we spied this old cupboard outside a flea market on the roadside ..we Inquired as to it's price and were promptly told it was free for the taking ..and us Farm Girls couldn't resist free ...
However sometimes FREE comes with a price ...and that price is a 4 letter word we call " WORK " ..
The great thing is were not afraid of work ...but sometimes you run into a few issues you have to overcome ...LIKE ...
 This is our Cupboard/Chest of Drawers ... we got ..and it's got lots of potential and great lines ...the One BIG issue was that it has a laminated top and doors ...the laminate on the top had lifted all around the edges about 1 to 3 inches in and was easy to rip off but from there in was this deep ridge of laminate that wasn't coming off ....So what were these farm girls to do ..but dig into our book of tricks and figure out the best solution to removing the laminate ...
If you have ever tried removing laminate before you may have run into alot of Frustrating issues ..if you tried sanding it off and spent endless hours with little results there's a good reason for that ..Laminate is a hard wood and adhered with hyde glue...Both near impossible to sand and if you do it's ALOT of work ..The Trick is Moist Heat !!

So Abbey and I thought we would give a tutorial this week while working on this piece on the easiest route to removing laminate that we know.
The tools you will need are ...
 A good sturdy hammer
 A sturdy 3 to 4 inch blade putty knife
 a measuring cup for some water for your iron
 a bowl with water and a wash rag or old cloth that can be ruined ..
 And Most importantly the tool that is a MUST an old iron ... (we suggest picking one up for this ocassion at a yard sale , estate sale, or second hand store ..) It need not be the best iron just one that works ...
First ...Place your wash cloth or old rag in water ...get it good and wet not sopping but enough that it slightly drips ..
Lay it on top of the laminate areas only NOT on the bare wood if any is revealed .. Lay it folded in half.
Let it sit a minute or two so the water penetrates the top layer at least ..Prepare your iron by adding water for it to steam if it has a steam button setting make sure it's ON .... make sure the iron is set on the hottest setting ...and then apply your iron atop the wash rag/cloth ...
(PLEASE USE CAUTION HERE) Once the Iron contacts the cloth remove your hand immediately ..it will steam ALOT ..and you don't want to burn your hands or arms !!! Make sure your children are kept away as well as your animals ....this is a VERY HOT project and all caution needs to be considered ...BE RESPONSIBLE and THINK !!!
 (TIP) Always place your cloth near the edge of the laminate ....it's easiest working from the edges in to lift the laminate.
After the iron has set there for at least a minute or more (use your own judgement and experiment a few times to see if you can add more time for a better result) ...then remove it CAREFULLY ..the rag will stick to the bottom so be careful taking it off you don't burn yourself ( grabe the rag on an end the iron wasn't touching as the iron isn't going to cover the entire cloth)..at this point we put the rag back in the bowl of water ...
Then Grab your Putty Knife and place it at the moistened edge ..and apply it at a slight angle so as not to dig into the wood but to get under the laminate..then use your hammer on the handle end ..driving the putty knife under the layers of laminate in a forward motion.
Here you have to use your own eye ..the laminate will lift where it's moistened ..but once you hit the dry area stop ....or the laminate will lift the wood with it and leave you with gouges which you probably don't want.
Also somtimes the top layer of lamintae will peel off only and you have to re-apply the steam ...to remove the deep layer to reveal the wood. It's just a matter of learning as you go ..once you have made a few passes ..you'll get the hang of it and you'll be a pro at it.
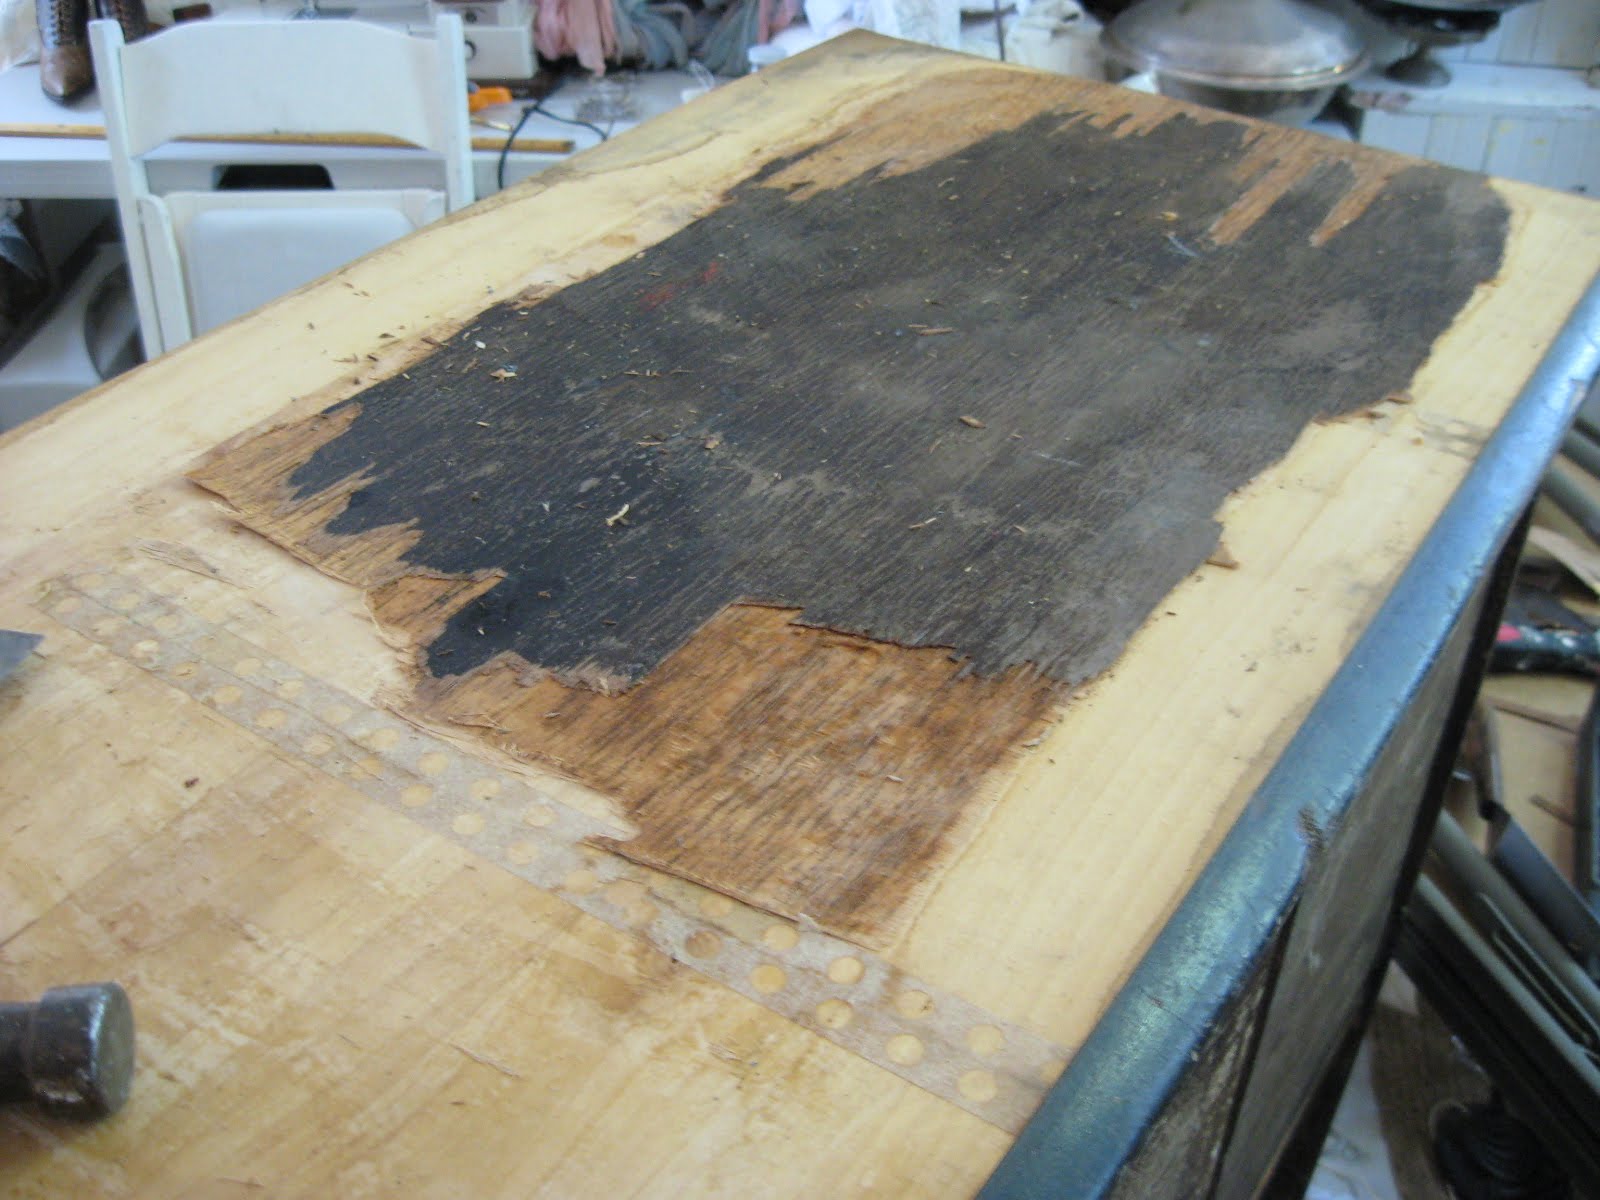 You can see here in the center where the laminate still is ....on the front edge the dark laminate top was removed the first pass with steam heat ..so now we re-applied the wet cloth and iron to get the next layer wettened so the glue starts to lift letting that lower layer loose from the wood base ... This also gives you an idea of what the wood should look like in comparison to the laminate layers.
We worked at the center for about an hour and a half before it was totally removed and we learned if we applied the wet cloth to the areas we weren't chipping away at... while we were chipping away at another section ... the other areas softened up and when we applied the iron to them ..they peeled much easier ..so the moister the better and the Heat from the iron is a must ..the combination is the trick to getting this laminate up easier !
Now an hour and a half is a bit long ..but we were learning as we went ..however it's actually pretty quick considering the horror stories I have heard other's tell about in removing laminate ...
Also if you are workin alone I suggest you have a place you can position your piece of furniture in... like agains a wall so when you are banging away at the laminate to lift it ..you have some resistance so your piece doesn't start sliding from the jostling it's getting ...
Once your finished you'll be happy with the end result ...
 Here's our end result of the top ..and I think we did a great job ...We had one little problem which I'll touch on below ...
But first of all I want to show you how the iron looks at the end so you don't die of heart failure and so you realize you " SHOULD NOT " use your good clothes iron to do this !!!
 Yep it's thick with glue ..even though we didn't touch it directly to the top and layed it on the wet cloth ..still this is the result ..Now I have some ideas for cleaning this up but as of this post haven't done it ..so as soon as I do ..I'll let you all know how to clean this mess up if possible ..
The one issue we had as I mentioned above is if you keep hitting away at the putty knife when you get into dry territory ..it causes the wood to lift with the laminate ..and you get these little gouges ..Now I can fill it with wood putty or sand it out which is fine ( we plan on sanding the top anyhow) ..but now we have a bit more work added on ..so to save yourself keep in mind when the wood gets dry stop and moisten it again with the wet cloth and hot iron ..Ultimately you may have this happen but I wouldn't worry too much ..your working with an old piece and it's bound to have some character and charm marks anyhow ..your just adding a few it didn't have to begin with ...

Once you finish you'll be left with this ..a great big pile of laminate shavings ...good and sticky from the heated glue ...and ready to head out to the trash ...

That's it for this tutorial ...I hope it helps you out in the future or even now on a piece your working on ..
We haven't started on the doors I'm actually going to see how they look sanded out as the laminate isn't coming off severely there anyhow and I like a little bit of age and charm around the doors anyhow ..
I I have not explained anything well enough OR If you have any questions ..feel free to leave them in your comment and I'll answer your questions in a special post next week giving time for everyone to get there questions in...
If you need your question answered sooner due to the fact you are working on it NOW ...leave that in your post and I'll try and comment right away with an answer for you.
Until Next Time ..Over an Out from these two Sweet Magnolias Farm Gals ...
The Finished Piece ....

Some Antique Glass pulls ...Old metal Address #'s ...a few Suitcases for drawers ...and A crackled paint process for that nice old look !!!

Some Antique Glass pulls ...Old metal Address #'s ...a few Suitcases for drawers ...and A crackled paint process for that nice old look !!!
Looking good girls... i can not wait to see what you will do next, I say white (hehehe)
ReplyDeletexo,
Sheila
Love to see items getting a make-over!
ReplyDeleteWe're almost neighbors, I live in Murrieta :)
What a great tutorial. Thanks for sharing this. I'll bet it'll look great once you've redone it. Have a great day.
ReplyDeleteOh my. You have a lot more energy than I do! Great result though!!
ReplyDeleteBlessings~
whew..thats alot of work!!! cant wait to see the finished piece!!!
ReplyDeleteGenius!! Thank you for sharing!
ReplyDeleteWow!
ReplyDeleteI never knew how to do this. So much work, but worth it.
Thanks for sharing,
Rosemary
great tutorial...it would have helped me with my last post lol...but mr.blowtorch worked & having a handy dandy husband to do it for you helps too!
ReplyDeletejudi ;)
This is awesome! I inherited an old buffet from my uncle which originally was his mom. I remember her watching me when I was just a little girl. I was excited to get the piece but it was in horrible shape. I've been trying to get the top laminate off and have gotten many gouges from chipping away. Alittle remains and I'd about given up and trashed the project. Now I can't wait to finish it! Thanks so much for the tip!
ReplyDeleteVery detailed tutorial! I have a question for you since you are now laminate pros :) I too got an awesome piece of furniture that is solid wood but with cheap laminate on top. I removed all the laminate, which actually came off easy but now I notice there is a "gummy" texture on top.... the glue from the laminate. I have tried sanding it off which somewhat works but not good enough. Do you know what I can use to remove the glue? Like a paint thinner or something? Any advice would be GREATLY appreciated. Thanks so much!
ReplyDeleteSandee :)
princeposse@gmail.com
Thank God for country gals! I went to a man-run tutorial before I found yours and I swear I could hear him bulch and see him scratch his ass! Just give it to me plan and in English please. No wonder men never get anything done.
ReplyDeleteI am restoring a 1940's Duncan phyfe table and chairs that were given to me and there was a lot of water damage on the table. Your tutorial will save me time, money, and a migraine. KEEP THE TUTES COMING!!
Thank you thank you! I just bought a yard sale peice very similar and came in from the garage so frustrated! Going back oout to acomplish the task hopefully a little easier! Thanks for sharing!
ReplyDeleteHi I loved your tutorial. I just took all the laminate off of an old buffet. Unfortunately I didn't read this until I was done. I was able to scrape and pull it all off. My one problem is there is still glue covering the real wood. Do you think I should use this process just to get the glue off or would sanding be better?
ReplyDeleteGreat tutorial. I was following your method and making very slow progress, when quite by accident, I discovered a faster way. One evening, I laid a thoroughly saturated towel (dripping) on the laminate, intending to apply the heat later. Well, I forgot all about it until the next morning. The top layer peeled right off, and when I applied the heat, the laminate came up in great big pieces. In a half hour I removed more laminate than I previously did in DAYS. Also, Arm & Hammer Scrub Free Bathroom Cleaner and a scrubee restored the iron to its original condition. :-)
ReplyDeleteThanks for the tutorial. I have a small table with blistering veneer on most of the top. So I started with the process as you described, but hubby thought it was taking to long and had another idea. So, I stepped aside and said, have at it! When I went back to check on his progress, it was all removed and he sheepishly admitted his idea hadn't worked and he had gone back to the wet towel and iron. LOL With a little sanding it will be ready for paint. Thanks again for your info. Cheers!
ReplyDeleteI've found Lots of necessary information from your blog. Just bookmark your blog for more explore! I will definitely share this post with others. Thanks for sharing.
ReplyDeleteI have been pounding away at this super old dresser with a tap and a hammer for over an hour now and could NOT get the laminate off- looked just like your mess with the dry spots. Grabbing the iron & using your method SO worked! Thank you SO much! I am so unbelievably thankful to you right now!!!
ReplyDeleteThanks for the tutorial. I was given a bedroom set and the nightstand has damage on the laminate top but in otherwise GREAT condition. I'd like to repair it so that it will still match the bed and dresser. Unfortunately my hubby first sanded the damaged area so we could smooth and re-stain but it looks worse!!! If I remove the laminate per your tutorial and sand lightly again, where can I find a matching laminate? I really want to keep it the same color and not paint the nightstand.
ReplyDeleteThanks for your help with the "freebir"
I went to the Salavation Army today and bought an iron. Your method is working great. Can't wait to get it done. I wanted to keep a natural finish, but I will try the new Plaster Paint and see how creative I can get. I won't be afraid of tackling veneer any longer. Thanks for your help.
ReplyDeleteJanet Meyers
Mustang, Oklahoma
Hi,
ReplyDeleteI found your site while researching how to remove veneer from an old dresser. My goal is to remove all the veneer then paint the dresser in a Mackenzie-Childs or Shabby Chic manner.
I want to present this piece to my daughter and son-in-law. They just announced her first pregnancy and though I do have other grandchildren from my son, I want to do something extra special for my only daughters' first child.
My question is, what type of wood will I generally find under the veneer and will it be friendly to painting?
Thank you for your time.
Monica McLean
Syracuse, New York
Hi Monica .. Generally from what I have learned veneered furniture usually had a less expensive wood such as alder or pine beneath it. Thus the veneer was a way to get a more expensive look such as fruit woods but instead of being solid fruit wood which would have been more costly it was veneered over less costly wood.
DeleteYou shouldn't have any problems painting the woods underneath .. they may require some sanding to smooth out any rough areas from the veneer removal but that should be it ..
Thanks for stopping by ..
Sara
Great, thank you Sara!
DeleteVery cool. You are very brave... I probably would have just thrown that all out!
ReplyDelete-Jackie @ Teak chairs
Thanks for sharing this tutorial. I was working on a cute side table and struggling with the last bits of veneer. I was too impatient to find an old iron and I wasn't going to use my regular one in the off chance I might need to iron my hub's pants... so I used my heat gun. It is one I've used for embossing cards and stationary. It worked pretty well. Probably, a real construction one would work better but I am happy to say my little table is on its way to being made over.
ReplyDeleteThanks for the tip on a heat gun ..I have a construction grade one ..and that seems to be a great idea too ... I would be concerned about catching the wood on fire ..as the construction ones can really scorch the wood... but I imagine there's a combination that would work for that too ..
DeleteKindest Regards
Sara
I just acquired a 2917 singer sewing machine in the original stand. The veneer just needs to be pulled off because u can see the 3 layers of veneer that's on it until u get to the wood. I want to restore it to its original how do I put new veneer back on again?
ReplyDeleteHi Susan .. You know we didn't put veneer on ours we just painted it .. Or you could stain it if you prefer .. we have never had the desire to re-laminate an item so I can't tell you how to do it .. I know you can by veneer laminate at Home Depot or Lowes and I believe the process is using an iron to get it to stick and an exacto-knife to cut the edges ... I would ask someone at the hardware store or better yet google how do I put laminate veneer on ..someone out there is bound to have a tutorial for that written and even possibly a video to watch ...
DeleteThanks for stopping by and best of luck !
Sara
Hello Susan and Sara, I too am looking for HOW to put it back on. Not just veneer, the VERY SAME exact veneer that was there. I don't know how but I do know it's possible. Professional restorers in France are able to remove whole sheets, large sheets, of veneer, in order to handle them as well as the the underlying surface and surrounding areas. So that's already a trick in itself. And the first one I'm looking for here. Even more impressive is the ability to get said sheets back in place, because they have to be 1/10 millmitre sharp (to four or more directions!) or your fingers will tell you that you didn't do it quite right. But this isn't the kind of thing I expect to find thru google... I'm just cruising here 'just in case'.
DeleteThis is a great tutorial! I have removed the veneer and the wood on the dresser looks to be pine so it will need some sanding I guess but removing the veneer left a very tacky glue on the wood, how do I remove the glue?
ReplyDeleteDid you ever figure out how to clean that iron?! I'd love it know!
ReplyDeletewow! Excellent post. That's great information. Thanks for sharing this blog. I did a search and found your blog and glowing review. It's been a big help! Thanx!
ReplyDeleteHey your blog is very cool! I am happy to find numerous useful info here in the post regarding furniture. Thanks for sharing..
ReplyDeleteCheap Furniture